


Guest post from pro Brett Jarnagin, creator of the Lightroom Retouching Toolkit:
Part I: Calibrating Your Camera Profile in Lightroom
Have you ever taken a RAW image that looks great on the back of your camera, but then looks different on the monitor? The colors aren’t as vibrant, the contrast is different…what the heck is going on?
What many photographers don’t realize (and get very frustrated about) is that Lightroom doesn’t automatically apply your camera profile settings. It reconverts them back to “Adobe Standard” which I have rarely found to be the best option.
To make adjustments to the camera profile of your RAW images:
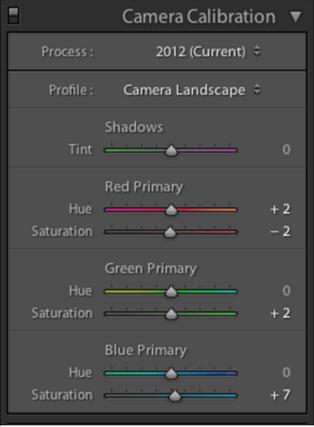
1. Within the "Develop Module," scroll all the way to the bottom of the adjustments panel until you see “Camera Calibration” at the bottom.
2. Click on the “Profile” dropdown menu, and you will find more options. Run through them all on several different styles of images, and take notes on which ones you like the best. If you don’t have options in that dropdown menu, you are most likely working with a JPEG file and not a RAW file.
TIP: If you are a JPEG shooter, whatever your camera profile is set to in your camera will be embedded in the image data and can’t be changed. Try shooting RAW, then run through these steps to find your favorite settings. Match them in-camera, and then switch back over to JPEG.
3. From within the Camera Calibration profile, you can also make small adjustments to the hue and saturation of your images. For instance, I like to lower the red saturation slighty, and slide the hue up a little bit to make skin just a little more orange than red:
Part II: Applying Profiles During Image Import
Applying your favorite profile to all of your RAW images when you're importing them is a great way to save time and make your editing workflow more efficient:
1. Find the camera profile and color settings that you like most consistently on all different types of your photographs. It is worth the time investment to make sure you are getting consistent results.
TIP: If you find that you like multiple camera profiles, follow through until the last step with your favorite, and then repeat step two only with the rest. Then, you can quickly change the camera profile with a preset of your own just in case the one that automatically applies doesn’t fit your style or look right.
2. Next, click the + sign in the Preset box on the left hand side, under your image preview:

3. Once the New Develop Preset dialogue box appears, name your preset at the top and select which preset folder you want it to go in. This is where you will find it in your presets menu later.
4. Select only the Process Version and Calibration as shown:
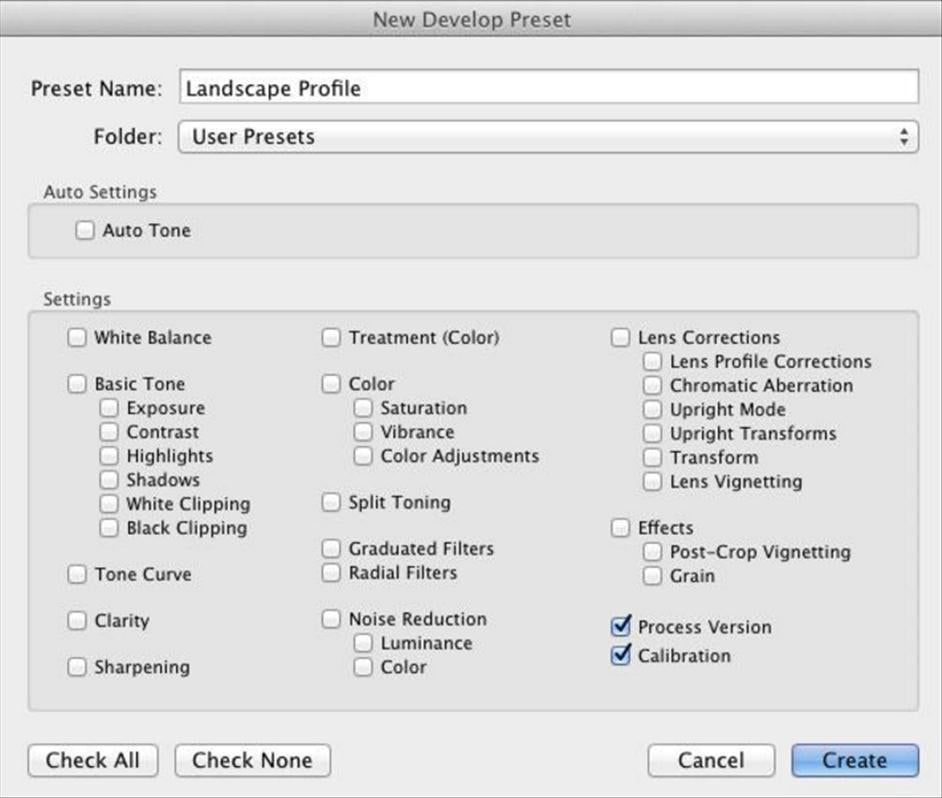
TIP: If you consistently change any one of these settings you can make those adjustments in step two, as well. Then just check their boxes at this screen and they will also apply on import. I like to raise the Clarity to +15 and the Vibrance to +10 by default. Find what works for you!
4. Now that you have created your own preset, you can use it the next time you upload your images. When you are at the import screen, click the little dropdown arrow to see more options in the bottom left. Click “Develop Settings” and select the preset that you created.
I would also recommend setting up your metadata and keywords because they will help with SEO (Search Engine Optimization). Your “keywords” should fit the subject each time you import, but metadata can likely stay the same.
5. Click “Import Preset” at the bottom of the import screen and select “Save Current Settings as New Preset.”
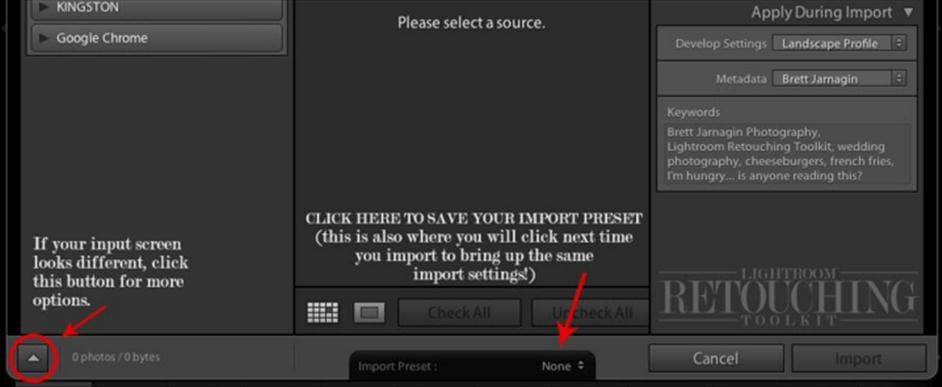
You're now ready to import your images! The next time you import, simply click the "Import Present" button at the bottom of your screen. Select the one you created, and all of your settings will automatically apply on import.