Whenever I’m doing a studio photo session, I almost always shoot tethered with my camera connected to my laptop and importing the images directly into Lightroom. This method has several huge advantages.
First, it allows me to see the images on a large screen instead of the small screen on the back of the camera, which is is great for checking focus and other fine details that otherwise could be missed. Second, I can flag the best shots while they're fresh in my mind during the session which, in turn, greatly speeds up my editing later. Both of these advantages are extremely helpful if you are collaborating with someone during the session such as the client, model, art director, etc.
There are some disadvantages as well. Shooting tethered is slower as you briefly wait for the images to appear on your computer, and it’s possible that you will lose connection at some point and need to reconnect. Plus, not all cameras can be connected for tethering into Lightroom. (Check out this list from Adobe for compatible camera models!)
Here are some tips on my approach to tethered shooting into Lightroom:
Set up your folders and Lightroom Collection settings
Before the session starts, I create a master folder in my computer named with the date of the photoshoot or the client's name. In Lightroom, I create a Collection Set with the same name as the master folder as well as a Collection named “All Photos” inside that Collection Set. (This is an optional step but I like using Collections and Collection Sets to organize the photos!)
Use the proper camera connections
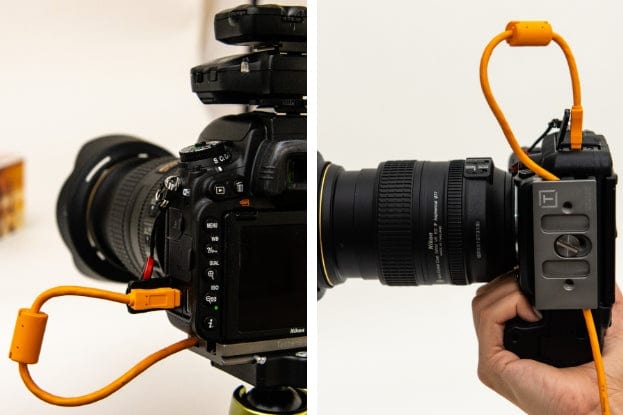
Plug in your camera to your computer using a mini USB cord from your camera and a standard USB cord going into the computer. This cord comes included with most new cameras but I prefer to use an orange colored cord made by Tether Tools (left picture) because it’s easier to see and avoid tripping over! I also highly recommend using the Tether Block from Tether Tools (right picture) which holds the cord firmly in place while connected to your camera.

Adjust the Lightroom tether options
Turn your camera on and, in Lightroom, go to File > Tethered Capture > Start Tethered Capture. This will open a dialog box called Tethered Capture Settings. Here I set the Session name to “All Photos” which will create a sub folder. I set the Destination to the master folder and check the box “Add to Collection” and select the Collection “All Photos” in the Collection Set for this photo session.

Once you have selected your settings, click OK to open the small Tethered Capture Window. It should show your camera model if you have a good connection. If it says “No Camera Detected,” double check your connections. Turn the camera off and on, or go to File > Tethered Capture > Stop Tethered Capture and then restart it. This dialog box can be repositioned on the screen so it’s not blocking your view, or you can hide it and bring it back with Control-T (PC) or Command T (Mac).
There is an additional optional setup step that I like to do. In the Tethered Capture Window under Develop Settings, you can select a preset which will apply to every photo taken. For instance, you could add Contrast, Clarity, and Vibrance. I then take a test shot with a gray card in the scene and adjust my white balance, then change the Develop Setting to “Same as Previous”. Now every photo taken will have all of those adjustments automatically applied when it shows on your screen.
For me, the advantages of tethered shooting far outweigh the disadvantages: it’s extremely helpful and makes the session more fun. Happy tethering!